A New Approach to the Determination of the Surface, Projection and Volume of Material Hardness in the Macro, Micro, and Nano Range
The unified principle and corresponding formulae for determining surface, projection and volume hardness of materials in macro, micro, and nano range is offered. The advantages of developed calculation methods for hardness determination are pointed out.
Keywords: Surface; Projection; Volume Hardness; Brinell; Berkovich; Vickers; Meyer; Martens Hardness
Contemporary production is tightly connected with the materials hardness testing on every stage of its development. This characteristic is widely used both for evaluating the quality of materials after different methods of their obtaining and treatment and for the mass product checking. Hardness testing is extremely urgent taking into account rapid developing the technologies of the surface modification, nanotechnologies and appearance of new nanomaterials. The gradation of nanomaterial according to their properties and the estimation of their operating characteristics are impossible without the estimation of hardness. However, up to now there is no general theory of hardness, which describes the processes of indenting materials as in the macro, micro, and nano ranges.
The classical determination says: hardness is the ability of material to resist to indentation of more hard body (indenter). The existing methods of evaluating the hardness do not entirely correspond to the determination given above. In 1940 professor O'neyl proposed the following classification for basic methods of hardness testing [1]:
1. Brinell hardness (ratio of load to the indentation surface area).
2. Meyer hardness (ratio of load to the projected area of the indentation surface).
2. Meyer hardness (ratio of load to the projected area of the indentation surface). 3. Russel hardness (ratio of load to the indentation volume).
The peak load, applied to the specimen through the indenter, adapts in all these methods in calculation formulae as numerator. However, it would be more logical to use not load corresponding to penetration of the indenter on the maximum depth, but resisting force to its indentation at the specific moment of time. After holding under the peak load for the some period of time (usually 10-20s) the indenter is removed from the specimen and geometric parameters of the impress are measured. These parameters are used in the denominator of calculation formulae for the hardness testing. So we take up the measurement of its parameters when material already resisted to the indentation of indenter and the elastic recovery of impress occurred. In this case it would be more logical to use in the denominator of formulae not the parameters of impress, but, for example, the parameters of the indenter part inculcated into material at the specific moment of time. This method would be much more correspondent to classical hardness determination.
Further development of science about the hardness of materials gave birth not only to appearance of new methods of its definition, but also inaccuracy in their names. Thus, for instance, such methods of hardness testing as Brinell, Vickers, and Berkovich were called – universal hardness [2]. Since 2002 the methods of Vickers and Berkovich by the international standard ISO 14577 were named – Martens hardness [3].
Meyer hardness correspondingly to the same standard was named the indentation hardness, although the same method was developed in the USSR in 1960 and named kinetic hardness. The measurement of hardness according to the method pointed out above, but in the nano range (depth of the indenter penetration does not exceed 200 nm) is known as the method of Oliver and Pharr [4]. The essence of this method was changed and consisted in the fact that the value of the peak load should be divided on the projected area of the contact of indenter with the material. According to the state above it is possible to assert that at present the unified method of the hardness calculation is absent and there are various interpretations and conception in the formulation of term “hardness”. The most important is that all known methods do not correspond to the classical definition of this term.
The purpose of this work is to develop the general method for hardness testing which would be independent of dimensional range (macro, micro, nano) and would entirely correspond to classical hardness definition. For achievement of stated goal it is necessary to solve the following tasks:
1. To combine all known methods of hardness testing into the groups and to formulate their general names and essence of each method.
2. To develop calculation formulas for the practical application of these methods.
3. To conduct hardness testing on the reference standards of the hardness, which confirm the expediency of the proposed methods.
All basic methods of the hardness testing conditionally can be classified into three basic groups [5]:
1. Methods, which use the surface area of impress or inculcated part of the indenter in their calculation formulae.
2. Methods, which use the projected area of the impress surface or inculcated part of the indenter in their calculation formulae.
3. Methods, which use the volume of impress or inculcated part of the indenter in their calculation formulae.
The first group of methods could be named the general term - surface hardness. The surface hardness should be understood as the ratio of the indentation resistance to the surface area of its part inculcated to material.
The second group of methods would be logical to name the general term - projection hardness. The projection hardness should be understood as the ratio of indentation resistance to the projected area of the indenter part inculcated into materiel.
Third group of methods could be termed volume hardness. The volume hardness should be understood as the ratio of the indentation resistance force to the volume of indenter part inculcated into material.
It is possible to determine surface, projection and volume hardness for unrestored impress method operating instead of F with peak load on the indenter, and instead of dimensions of indenter part inculcated into material– impress parameters. If the dimensions of impress are difficult to obtain, especially in the micro- and the nano ranges, it is recommended to use the hardness testing by the last contact point of indenter with the material.
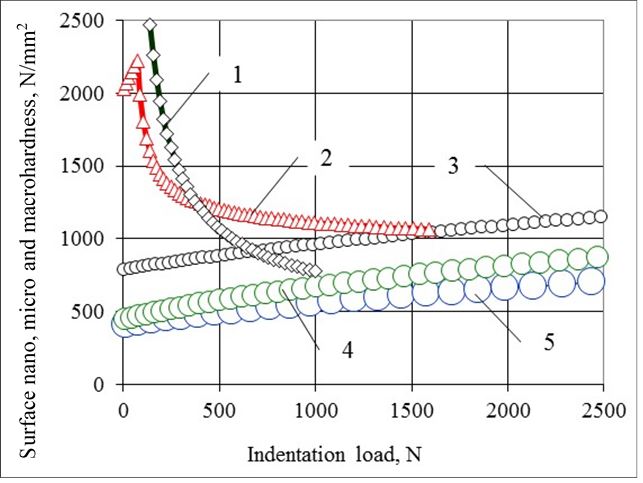
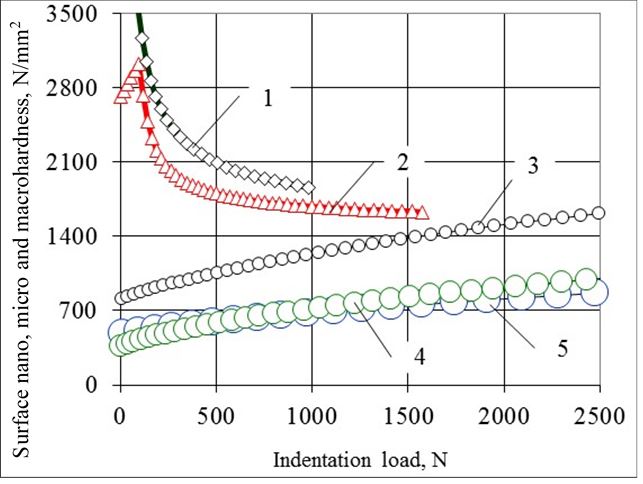
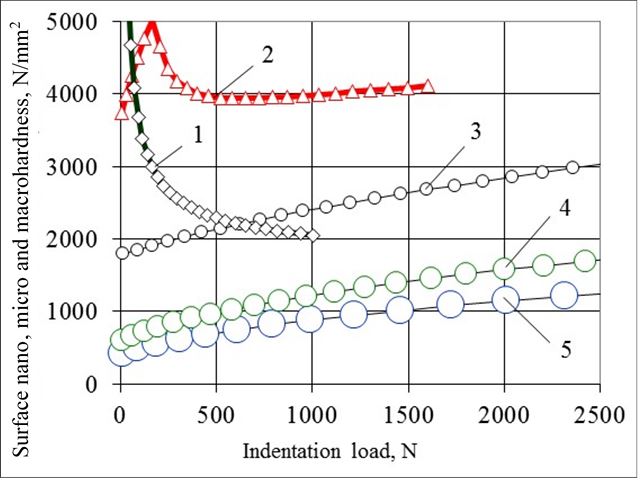
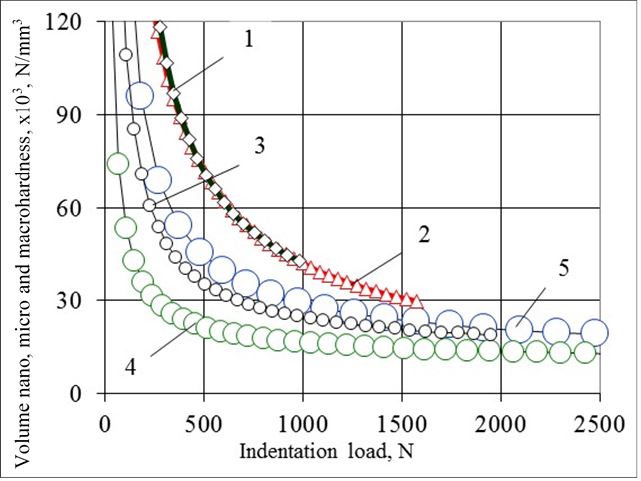
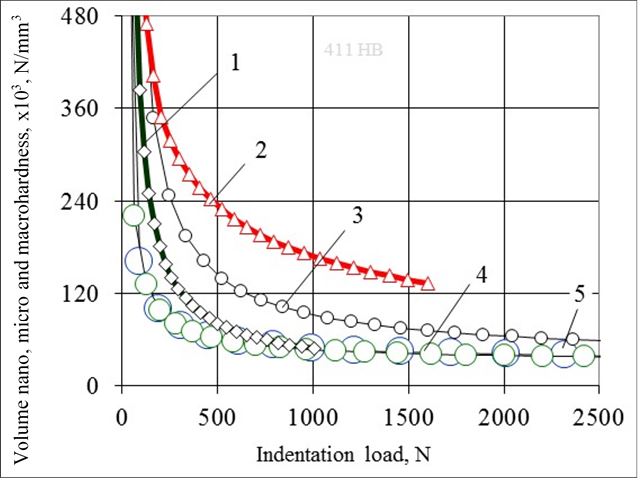
Proposed methods for evaluating the surface and volume hardness were tested by indentation the indenters of various forms (balls ø2, 5; ø5 and ø10 mm, Vickers pyramid; spherical-conical indenter with the 120° apex angle and the radius of curvature of apex 0,2 mm) into the reference standard of hardness ~100 HBW, ~180 HBW and ~400 HBW (Figure 1 and Figure 2 ). The formulas for which the hardness was calculated in the macro, micro, and nano ranges are given in our publications earlier [6,7]. As it follows from the obtained dependences the character of changing surface hardness during the indentation by balls is identical, i.e., with increasing depth of indenter penetration hardness also increases (Figure 1 ).
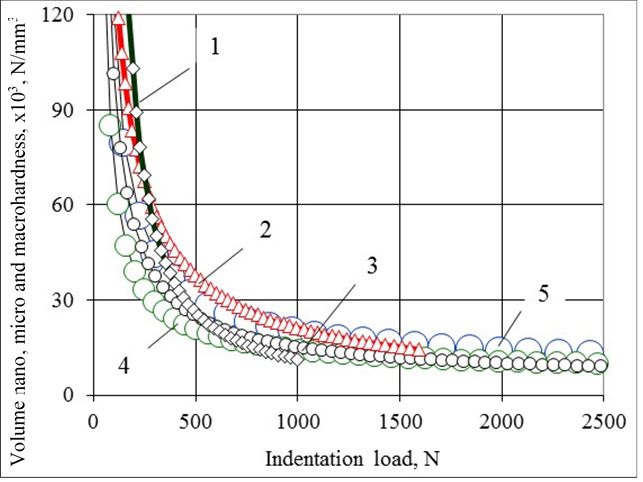
Absolutely different character of changing hardness is observed by using Vickers pyramid and spherical-conical indenter - increasing depth of indenter penetration follows hardness decreasing. Such effect of hardness changing was called the reverse (for the ball indenter) and direct (for the spherical-conical and pyramidal indenters) size effect. It should be pointed that operating with spherical-conical indenter the surface hardness at first increases (because spherical part of the indenter works) and then it begins to decrease, both spherical and conical of the part of the indenter work (Figure 1 , a – 2; Figure 2 , b – 2; Figure 3 , c – 2). But volume hardness decreases with increasing depth of the penetration for all forms of indenter (Figure 2 ). And such character of its changing is observed for different reference standards of hardness (Figure 2 , a, b, c).
The same character of changing surface and volume hardness was revealed also in micro- and in the nano-ranges by using spherical, -conical and spherical-pyramidal indenters.
1. The new approach for materials hardness testing in macro, micro, and nano ranges was proposed. It consists in dividing resisting force by the surface area (surface hardness), the projected area (projection hardness) and the volume (volume hardness)of the part of indenter inculcated in material.
2. The formulae for calculating the surface, projection and volume hardness for the most widespread forms of indenters are obtained.
3. Proposed new methods for hardness testing are approved on the reference standard of hardness measures. The phenomena of direct and reverse size effects are discovered on the hardness testing.

